How to replace the gum with your own hands on a washing machine
Almost every owner automatic washing machine sooner or later face the failure of any part. Some damage is better to entrust the hands of professionals, but you can solve most of the problems yourself. For example, it is very simple to replace a failed cuff and thus not overpay for the work of a repairman. We give recommendations on how to remove and change the gum on the washing machine with your own hands.
Content
Why did this problem occur?
There are quite a few reasons for the urgent replacement of the sealing gum or, in other words, the hatch cuff. Here are the most common versions.
- Natural wear of the partwhich arises due to the long life of the machine.While the drum is in operation, there is a strong vibration, therefore, the gum will simply be erased over time, cracks and microdamages appear.
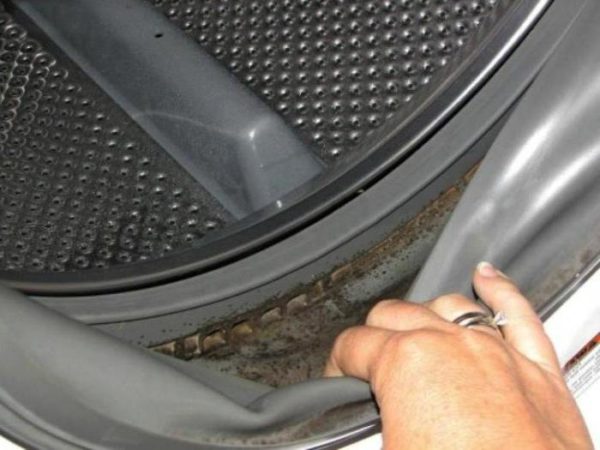
- Mold growth from the inside of the gum. Appears due to the use of poor-quality household chemicals: powders, gels, rinses. Read how to get rid of mold. here.
- Damage (cracks, tears) of the cuff due to wash solid items. It happens that before washing we forget to pull various small things out of our pockets: coins, keys, key rings, pens, paper clips. Washing clothes with large fittings and metal elements such as buttons, locks, and rivets can cause a potential danger.
- If washing occurs in hard water, and softeners are not used, limescale is gradually deposited on the internal elements of the machine, which can also lead to the future replacement of the rubber seal.

You can understand that it’s time to change the cuff of the washing machine water formation under the machine.
After all, the leakage mainly signals the appearance of a problem. As a result, all this can lead to electrical closure and complete failure of the unit.In order to remove the cuff and instead install a new one, you will need from 20 minutes to an hour, depending on the complexity of the problem of the model of the washing machine.
Where to begin
First of all we go to the spare parts shop for automatic washing machines. You need to choose a seal that will completely coincide with car brand. Cuff should be identical oldotherwise, it will not install properly or not at all.
Before starting work, make sure that the machine is completely disconnected from the mains.
Remember: any repairs, including replacement of the cuff hatch washing machine, held only when the device is turned off!
Cuff removal
How to replace the hatch cuff so that it does not damage the other parts? No special tools are required for this, round pliers and a flat screwdriver will be enough. Just in case, prepare a cleaning agent and a rag to remove limescale, mold and other contaminants, if any.
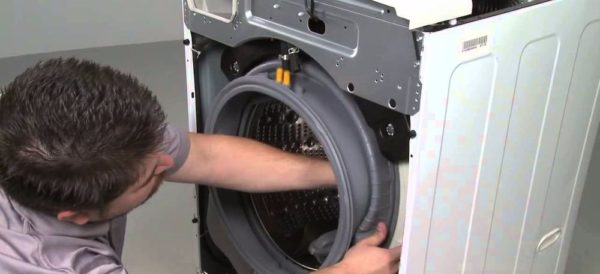
- For the convenience of work and free access to the rubber gasket, you need to remove the front panel of the machine body. Remove the powder tray and unscrew the screws holding the top and bottom panels.Then - a line of screws in the front of the machine. When removing all panels, remember which screws belong to which panel: they should not be confused.
- When the front panel of the washing machine is removed, you can detach the hatch itself. Sealing gum for a washing machine is usually attached to the tank body with two clamps. If the clamp is made of metal and held in place by a spring, just pry it with a screwdriver and pull it towards you. Remove the additional screws. Sometimes the clamp is made of plastic and it is much easier to remove it than the metal one.
- After removing the first clamp, unfasten the upper part of the elastic band. On it you will see the mounting mark, which indicates the correct location in relation to the tank machine.
- Similarly to the fixing collar, remove the second one and release the replaceable cuff completely. On its lower part is the second mark. Please note that on the rim of the hatch there are also similar marks - it is precisely guided by them that you can then correctly put the new cuff.

Installing a new cuff
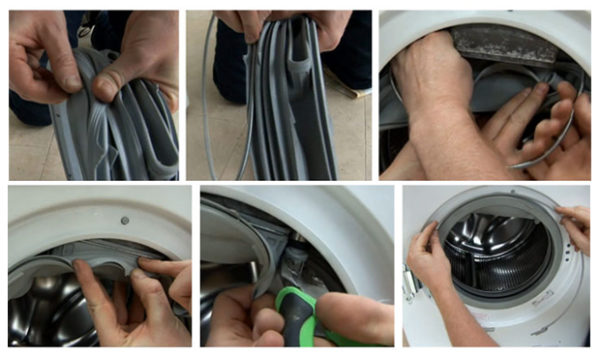
Before fixing the new hatch, make sure that it fully complies with the brand of your car, otherwise the seal will be weak.Thoroughly rinse the so-called "rim" of the hatch from the accumulated dirt, lime and mold. It is enough to take any soap solution.
It is not necessary to wash off the soap: due to sliding, it will be easier to install a new rubber band, because the new part is most likely dense and inelastic.
Check whether the mounting marks on the edge of the tank and the cuff itself match, and tighten the cuff on the hatch. We hold the lower part with our fingers, pulling the upper part, then vice versa. As the lubricant is useful all the same solution of soap.
Then we act in the same way as when removing the rubber. We return the clamps to the place, fasten the screws and check whether the cuff is tight. After all, if the installation proved to be of poor quality, leaks are possible in the future.

To make sure that you have succeeded in replacing the sealing rubber correctly, run the wash cycle on a short program without putting things in the hatch. After the process is complete, see if there is water in the lower part of the cuff.
Conclusion
Of course, to change the sealing gum, you need some skill and basic knowledge of machine designs. If you have any difficulties during the work, or you are not sure of the correctness of your actions, it is better to contact the professionals. In addition, the replacement of gum or other parts in the washing machine should be made when the first signs of malfunction appear, otherwise, in the end, this may lead to the final equipment failure.
To prevent premature wear of the cuff, you need to know how to clean it properly. It is dirt that becomes the source of bacteria, which later erode rubber and cause the device to be repaired.

/rating_off.png)


