Proper installation of the fan in the bathroom
The problem of ventilation in the bathroom and toilet often appears in apartment buildings. Channels of natural ventilation in such buildings are often damaged, as a result, they can not perform their functions. In addition to this problem, in the buildings of the old building during the construction of ventilation ducts, the calculation of air exchange was made with regard to wooden windows, but not plastic, which does not allow a gram of air outside. Therefore, in order to improve the ventilation in the apartment and in the bathroom, in particular, the installation of a fan in the bathroom is carried out.
Content
Natural ventilation check
Before you install the fan in the bathroom, you need to determine how well the natural exhaust works. This is done in a simple way: take sheet of thin paper or unfold a napkin; open the window in any room; Attach the paper to the hole in the hood. If the napkin is immediately attracted to the hole - this means that the natural hood works correctly. If the napkin does not attract, then you should think about installing a fan in the bathroom.
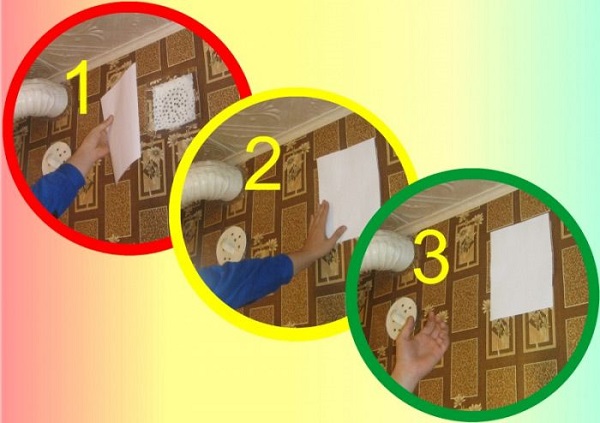
You can check the efficiency of the hood, if brought to the hole lighted match or lighter. If the flame strongly deviates towards the channel, then the ventilation is working normally. Otherwise, with a weak flame deflection or if it burns evenly, an exhaust cooler will be required.
The stagnation of air in the bathroom or toilet leads to the formation of high humidity in the room and, as a consequence, to the appearance of fungus on the walls. It’s not worth talking about how harmful mold health is to human health.
If you are convinced that the ventilation duct is clogged, then it can be cleaned by lowering a cone-shaped weights into it.If for any reason you can’t do this, contact the public utility, they will tell you which organization you need to apply for.
Choosing an exhaust cooler
Before mounting the fan in the bathroom, it is necessary to make measurements of the width, height and depth of the vent and record the data obtained. Based on this information, you should choose the fans in the store.
Calculation of the power of the cooler very important before buying a hood. According to sanitary standards, the air in the bathroom should be changed 6-8 times within 1 hour, and the fans should cope with this task. The power is calculated using the following formula: L = V * K, where L is the air volume for a complete air exchange (m3/ h), V is the volume of the room, and K is the air exchange rate (how many times the air must change in 1 hour).
Calculation example: Room length - 2.5 m, width - 3.2 m, height 2.8 m. We recognize the volume of the room: V = 2.5 * 3.2 * 2.8 = 22.4 m3. Next, we substitute the obtained result into the formula: L = 22.4 * 8 = 179.2 m3 / h. Based on the calculation, the cooler should in one hour pass 179.2 m3 / h of air through itself. When choosing a device, it is recommended to stay on the model that will be 20% higher than the calculated one. That is, the unit must have power reserve. In this case, to install a fan in a toilet or bathroom with such a volume, a cooler with a capacity of 200 m3 / h will suffice.
These calculations are also relevant if you have a desire to put a fan in the kitchen.
The installation of an exhaust fan in the bathroom is governed by the norms of permissible noise. Since increasing the power of the device inevitably increases its noise, then when choosing an aggregate, the standard should be followed: the sound power from the cooler should not exceed 30 dB.
Wiring diagrams
To connect the exhaust fan in the bathroom, there are 4 schemes. But, if you will carry out installation work and manipulations with electrical wiring with your own hands, take care, first of all, about safety regulations. It is necessary to turn off the necessary switch on the electrical panel so that in the place where you will work, there is no voltage on the wiring.
All circuits are designed for three or two-wire wiring. If the wiring is strong, the units are connected without grounding.
Light bulb connection
The connection scheme of the fan in the bathroom, implying the connection to the lighting fixture, is quite simple and is shown in the figure below.
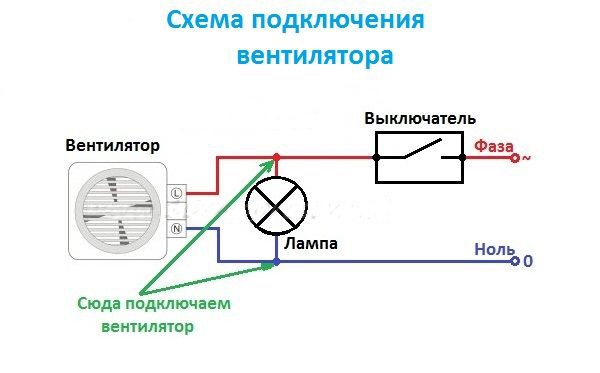
The only drawback of such a connection is that the ventilation will work only when the light is on.
Connection via a separate switch
To avoid the above disadvantage, there is a way to connect the cooler through the switch. The scheme of connecting the wires in this case also does not differ in complexity, and how to connect the fan in the bathroom to the switch is understandable even to a non-specialist.
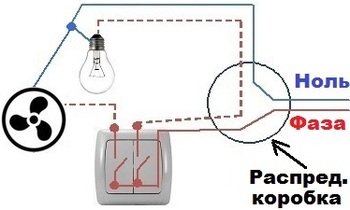
To connect the equipment according to this scheme, you will need to install two-button switch. One key will be used when the lighting is turned on, the second - to start the hood. You will need to hold the “zero” wire to the cooler by connecting to the “zero” of the light bulb, which is routed from the junction box. The phase from the junction box must be led to the switch and connected to two contacts leading to the cooler and the light bulb.
Cooler with timer
Coolers equipped with a timer, much easier to operate. But the cost of such equipment is higher. Wiring diagram for a fan with a timer is shown below.
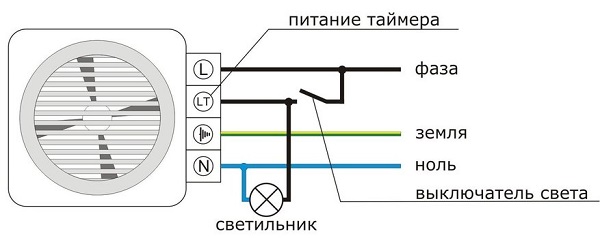
A cooler equipped with a timer works according to the following principle:
- when the lighting is turned on, the unit starts working;
- after turning off the light bulb, the fan with the timer continues to operate for a while (pre-installed), removing excessive moisture and odors from the bathroom or toilet, and then turns off.
The fan is connected with a timer using four wire: L is the phase from the junction box, LT is the wire from the light switch, the ground wire and N is “zero”.
Device with sensors
If you are planning to install and connect a fan in the bathroom, then you should pay attention to the devices equipped with humidity sensors or movement. The work of such fans in the bathroom and toilet is completely autonomous, and does not require any participation from you.
For the toilet there will be enough installed apparatus with motion sensor and timer. When a person enters the toilet, the sensor in the unit will detect movement and turn on the hood. When a person leaves the bathroom, the sensor will issue a shutdown command, but the device will turn off only after the time set on the timer expires.
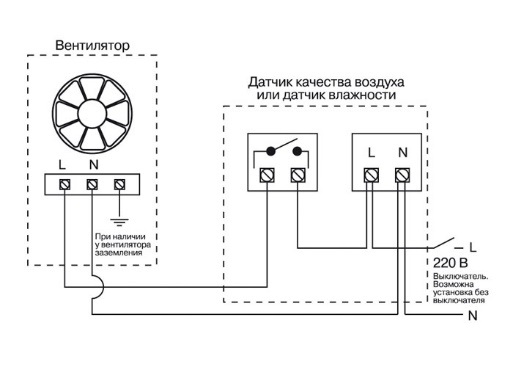
Installing a unit in the bathroom, such as a fan with a humidity sensor, means making the perfect solution to combat dampness in a given room.. If the humidity in the room rises to the maximum set limits, the cooler will automatically start working. After reaching normal moisture, the unit will stop. Thanks to this sensor, the bathroom will always be fresh and dry.
The following figure shows a diagram that will help you install an exhaust fan equipped with sensors.
Wall mounting
Under the decorative panel of the fans are holes for mounting the case to the wall or ceiling. Therefore, you should attach the device to the vent hole (sometimes you have to expand the vent) and with a pencil mark the places for drilling.
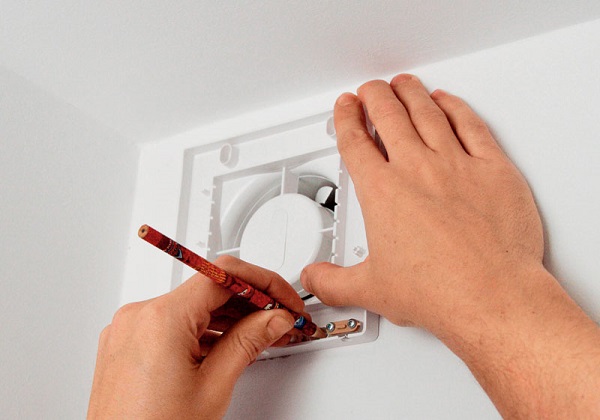
Next, in the places where you put the mark, you need to drill holes using a hammer drill or a hammer drill. For the latter, you must use drill bit soldered “on concrete”. After drilling the holes, drive the plastic dowels into them, insert the cooler into the outlet and fix it with self-tapping screws.
Attention! Before you connect the fan in the toilet or in the bathroom, do not forget to turn off the common switch on your apartment or machines under the electric meter.
Now that the equipment is installed, you can connect the wires using the diagrams above.
There is another option with which you can install a fan in the toilet or bathroom without using power tools:
- purchase liquid nails or silicone glue from the store;
- clean the surface of the wall in the place where the cooler is attached to plaster or whitewash;
- apply glue around the vent using a pistol or squeezing it out with a hammer handle;

- insert the cooler into the vent and check the horizontal using the level;
- fix the device in this position with tape;
- after 2-3 hours, fixation can be removed;
- After connecting the wires and returning the decorative panel in place, the installation of the fan in the bathroom is completed.
For clarity and better assimilation of the material, you can see the following video.
Ceiling installation
The exhaust fan in the bathroom or in the toilet can also be installed on the ceiling (stretched or suspended).
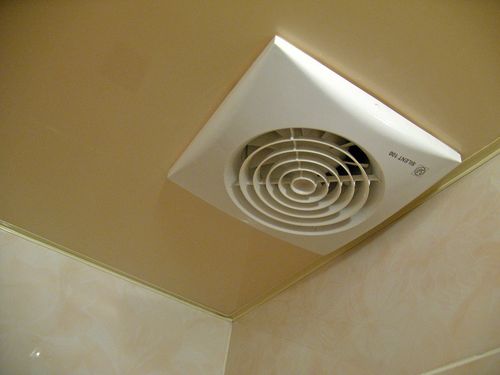
Ceiling placement is often used in private homes, when the ventilation duct can be led through the ceiling and laid across the attic.. In such cases, the use of channel fans, which are also located in the attic, is recommended.

When stretch ceiling or suspended, the situation is a bit more complicated. It would be more reasonable if you, before installing various ceilings, prepare a place for installation of equipment. The grille or cooler can be screwed to the drywall using a butterfly plug. In the case of a stretch ceiling, the equipment is attached to a pre-installed stand.
If the stretch ceiling is already mounted, then you will have to dismantle it to install the cooler and carry out all communications.
Of course, dismantling the suspended ceiling is not an easy task, and very few people will go for it to install a fan. There are 2 solutions:
- You can try to stretch the wires through the previously made hole in the right place, then close it up so that it becomes invisible;
- conduct wiring from the plug-in unit directly on the ceiling, and hide it with a cable channel.
In any case, with self-installation of ventilation equipment, it is important to consistently perform the above operations without haste, with observance of safety rules and with great care, especiallyif installed on a stretch ceiling.

/rating_off.png)


