Why the washing machine does not wash after a set of water
Modern washing machine - This is a complex, sometimes capricious technique. It happens that the washing machine takes water, but stops and does not wash after starting the washing program. There can be several reasons:
- drum lock;
- stop due to belt problems;
- burned TEN - tubular electric heater;
- the electric motor failed;
- burned down control module.
Content
Drum lock
First of all, check the drum for mechanical lock. Rotation can be prevented by foreign objects stuck between the tank and the drum. After removing this item, the work of the machine will be restored.
Stop due to belt problem
AT direct drive cars the belt is missing. Therefore, for such units, the first item of troubleshooting is not relevant. For the remaining machines, the search for the reason that the drum does not rotate is better to start with belt check. If you have a machine vertical loading type linen, the belt is located behind the side wall of the unit. In automatic washing machines (AFM) front loading It is located behind the rear wall of the housing.
Removing the wall should not be difficult, just need to unscrew all the mounting screws holding this panel.
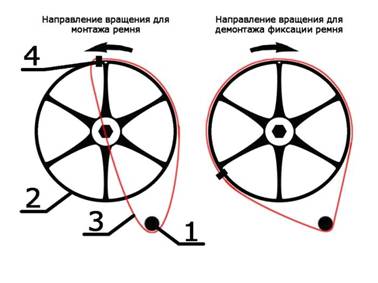
Flying strap need to carefully inspect. If there are scuffs on it, or small tears - they could cause it to jump off. Defective item must be replaced with a new one. In order to put the serviceable belt back, first put it on the motor pulley. After that, put one side on the large pulley of the drum, and begin to rotate it counterclockwise until the rubber element is fully dressed.
Blown heater - tubular electric heater
When water is collected in the washing machine, they turn on Heating element on heating. When a certain water temperature is reached, the sensor triggers the engine.If the water is not heated, the sensor does not start the rotation. To get to the heater, you will need to open the back panel of the AFM. In some models, the heater may be located in front, so you need to remove the front panel.
TEN is installed in the lower part of the tank. To him fit the wires that need to be disconnected. In order not to confuse the position during assembly, they can be photographed.
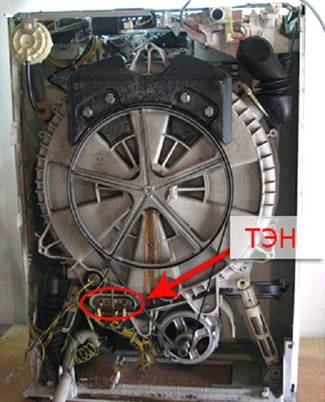
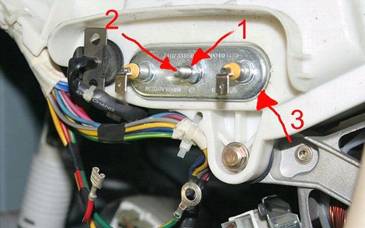
To remove the heating element, unscrew the nut located in the center. Then you need to deepen the protruding bolt inward, slightly knocking on it. Taking a flat screwdriver, pry the heater body with it, and loosening it, pull it out of the tank.
Checking the heating element
Initially, the heater should descale. If during the examination of the heating element you saw black spots on it, there is a high probability that a breakdown occurred. Such a heater is required replace with a new one. In the case where there is no stain, it is desirable to “ring out” with a tester. To do this, switch the device to measure the resistance, and measure it between the two contacts of the heater.
With good TENe, the resistance can be from 20 to 40 ohms, and in some models 60 ohms. If this figure is less than 20 ohms, then the item is faulty.
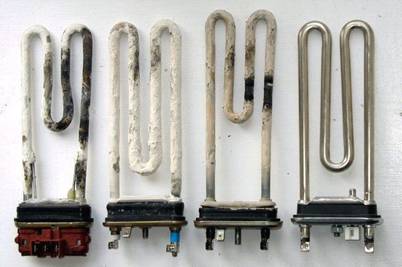
Re-installation of the heating element
The principle of sealing between the tank and the heater is as follows: on the body of the heating element there is a sealing rubber gasket with a bolt in the center. When you screw a nut on this bolt, the rubber seal expands, and due to this it is tightly fixed in the tank.
Try to gently insert it into its place in the opening of the tank. If you position the element a little higher, the heater will cling to the rotating drum (after installation, roll the drum to avoid touching).
Motor failed
A motor malfunction can also cause things to not wear out. Frequent engine problems include:
- wear brushes inside email motor;
- the starting capacitor in the asynchronous electric motor does not work (asynchronous electric motors do not have brushes).
Note - the engine may not turn on due to overheating, the cause of which may be a long wash (several loads in a row for 1.5 hours).
To replace the brushes, do the following:
- Remove the engine by unscrewing a few bolts.Disconnect all sensors and belt.
- Using a screwdriver, disconnect the terminal from the brush.
- Next, you need to get the carbon electrode from the engine, unscrewing the bolts, or squeezing the spring. If it is shorter than 1.5 cm, a replacement is necessary. When removing the brush, pay attention to the ember, in which direction his end is set. If you insert it on the back side, there will be a sparking motor.
- We take out the second brush and remember where the coal is (you can take a picture).
Note - brushes must be suitable for this model of electric motor. Engine model can be found by reading the markings on its body. Embers need to be changed only in pairs. It is impossible to replace one brush, and leave the second one not half worn out.
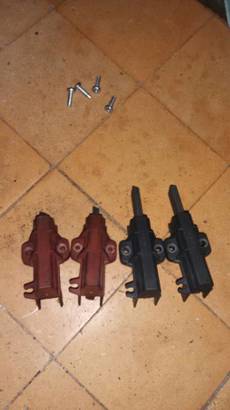
Now it is required to clean the collector from coal dust and scratches. Take the smallest sandpaper, better - “nulevka”, attach it to the collector and roll the shaft. Continue rotating until the surface of the collector is free from contamination and is not polished from scratches. Install the carbon elements in place at the correct angle, and fasten them with screws.
To complete the repair, install the engine in the AFM case, connect all the sensors and the belt. Close the back cover of the washing machine.

Control module burned out
If the verification of the above points confirms the absence of malfunctions, then there is a probability of breakage. control module. But this fact can rarely be the reason why the washing machine does not erase by running the program and typing water in the tank. The breakdown of an electronic board is a problem that only a professional master can solve. Only a specialist can determine if it makes sense to repair it, or if a replacement is needed. Even if you know about electronics, it is not recommended to start repairing it yourself. Such a “repair” can cause even more problems.
As a result, if the AFM failure caught you off guard, then in most cases you can do without calling the master. With the above failures, you can quite cope on their own and save money.

/rating_on.png)


